Monday, December 20, 2010

Calendar - Designer's Calendar Cricut Cartridge


This calendar is 8x81/2" and was made using the Cricut Expression. The Designer's Calendar from ProvoCraft is the cartridge I used.  The snowflake is 1 3/4" and the mitten is 2". I used Stickles for the days of the week and on the snowflake and mitten.  I used Teal, Brown and Green paper for my colors.

MyPinkStamper is having her Day 8 Challenge today, Dec. 20, 2010.  She is having a Color Challenge: Teal or Blue and Green and Brown.

For the giveaway you get to pick a cartridge of your choice from Custom CropsYou can make a card or scrapbook page or whatever you would like using the required colors.  I made the above calendar for her challenge.
Visit Robyn at http://www.mypinkstamper.com/.  You might be her winner and win a free cricut cartridge from Custom Crops.....what a great giveaway.
Good Luck!!
Happy Holidays!!

Sunday, December 19, 2010

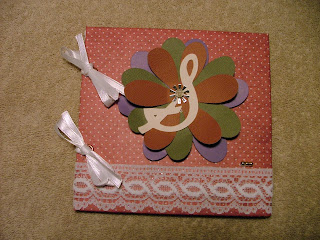
Book - Accent Essentials Cricut Cartridge


This book is 6x6" with white typing paper inside.  I used my Crop-A-Dile and put two rivets on the front and two on the back cover of this book. I used chipboard and covered it with the paper, you see above. Then I put a piece of white paper on the inside of the front and back cover (like a book) to hide the endings of the paper. I used ribbon at the bottom of the book.  I threaded white ribbon (2 pieces for top and 2 pieces for bottom) through the front cover, typing paper and back cover and tied a knot and then a bow.  The Cricut Accent Essentials cartridge was used to make the flower in the center of the book. Each paper color is 1/4" smaller than the last. I used the Cricut Cursive 101 cartridge to make the "S" in the center of the flower and bent the petals upward. I added three little silver balls below the flower.  To finish this project off, I added a clear ball embellishment on a silver, flat embellishment.

This is going to be a present for one of my friends. This project was easy and so much fun to make.

Hope you have a VERY Merry Christmas!

Saturday, December 18, 2010

Christmas Card - Joys of the Season Cricut Cartridge

This is a 5x7" Christmas Card made from the Cricut Joys of the Season cartridge.  I used My Minds's Eye, O Christmas Tree paper for the candle.  The stamp is from Stampabilities DR1078. Ribbon Boutique #505206 is the red ribbon. Gray, red and green paper from the paper Studio was used for the background sheets. Layers was selected for the holly and berries and flame.  Stickles is the glitter used on the flame and berries.

This card was prepared for MyPinkStamper's, Day 6, Holiday Challenge on Saturday, December 18, 2010. You can join in on the fun by visiting http://www.mypinkstamper.com/.  Her criteria is to make a "Christmas card or scrapbook layout?  If you don't celebrate Christmas then do a Winter themed project.  Remember that this has to be something that you create JUST for this challenge.  It cannot be something from your past blog entries or uploads."  Her giveaway is her "latest DVD, Cricut Layout". Check her blog out and join in on the fun.  Who knows, you might win her free giveaway.  Good Luck.

Happy Holidays!!

Wednesday, December 15, 2010

Christmas Card - Joys of the Season Cricut Cartridge

This card is 5"x7".  Joys of the Season Cricut cartridge was used to cut the doves and snow flake. A pink and a blue ribbon were used to accent and the Celebrate the Season stamp is from Inkadinkado.  I used the cuttlebug on the light blue paper to add texture. 

This card is made for the "MyPinkStamper" color challenge. This is her 2nd Day of 12 days of Christmas challenge.  If you would like to enter her challenge, go to http://www.mypinkstamper.com/.  She listed this challenge on Tuesday, December 14, 2010.


The requirements are:  COLOR - Make a project using 2 shades of pink, 2 shades of blue, and black!
Details:  This needs to be something you make for My Pink Stamper Challenge and is current.
 
Good Luck and Happy Holidays!

Sunday, December 12, 2010

Christmas Cards - Joys of the Season Cricut Cartridge


These cards are 5x7".  I used the Cricut cartridge 'Joys of the Season" for the candle on page 55.  I used the layers for the tray, holly and flame with different colors of paper.  I used Stickles Crystal for the glitter and a piece of lace at the bottom of the card.  I used a  Stampabilities "Merry Christmas" stamp on the cards. I used Copic Marker R46 and colored in the holly by Merry Christmas.  Each card is made a little different from the other card.

Note Books - YourStory Laminator/Binder


Some more pictures of books I made for Christmas.  They are all sizes with typing paper inside and a ribbon on the outside.  I used my YourStory laminator/binder machine to bind the books. 

I use a piece of thick cardstock and cut it to the size I want the book to be. Remember to add for the back. Now add a sheet of printed paper 1/4" smaller than the hard cardstock (frames the cardstock) and glue down to the cardstock paper.

Find the center of your paper and mark 1/4" on each side of your center (you can adjust the 1/4" to smaller or larger depending on how much paper you want to insert into your book).  Bend the paper. 

Use a hot glue gun and put the glue all the way down between the folds, leaving 1/2" at the top and bottom with no glue. Insert the book into your YourStory binder.  Cool the book.

Tie a ribbon around the front cover.

Tuesday, December 7, 2010

Birthday Card - Celebrations Cricut Cartridge


This Birthday card is 5x7".  The Gorilla and sound is from the Animal Kingdom Cricut Cartridge. The happy birthday tags are from the Celebrations cartridge. The colored paper is from Stampin Up. 

Birthday Card Challenge:

My Pink Stamper is having a Cricut Birthday Challenge. You can see the challenge at:  http://www.mypinkstamper.com/2010/12/birthday-challenge.html  

MPS' challenge is to make a birthday card, layout, 3-D item, gift, etc.  MPS is giving a Cricut Birthday Cakes Cartridge to the winner. 

This is my card for the MPS birthday card challenge.

Monday, December 6, 2010

Note/Drawing Books for Kids - Your Story Binder/Laminator


My grandkids are always asking for paper to draw and write on so I decided to make them their very own books.  The books are 5"x7".  I use heavy card stock paper for the covers.  I use typing paper for the inside. 

If you have a YourStory binder/laminator you can make these books easily.  Cut your cover card stock paper 1/2" bigger than you want your book to be.  Find the center of the paper and score 1/8" or 1/4" on each side of your center mark (depending on how much paper you put inside). Fold the creases. Use your glue gun and put a good bead of glue all the way down leaving a little area blank at the top and at the bottom.  Let the glue dry. 

Next, cut whatever paper you want to use for the inside of the book, about 1/4-1/2" smaller than the front cover.  Put your inside paper tight to the glued center of the book.  Turn your YourStory binder on and push the binder up arrow. When your YourStory is ready, put your book in until you hear the beep. Take your book out and set in the tray to cool. 

Put a ribbon on your book and add a nice little note and a few stickers on the first page for your little one.

Your little one will love having his/her very own book.

I also added a design piece of paper to the inside and back of the book covers and to the front and back outside covers.  Let your imagination go with designing this book.  Add some Christmas pencils and you have a nice stocking stuffer.

Sunday, November 21, 2010

Thanksgiving Card - Wild Card, Home Accents, Stretch Your Imagination and Easter Cricut Cartridges


This Thanksgiving card was made with my Cricut Expression.  I used a 10"x7" brown colored paper folded to 5"x7".  Next I cut a lighter brown paper to 4 3/4"x6 3/4". Then a Green designed paper was cut at 4 1/2"x6 1/2".  Using the Easter 2010 Cricut cartridge, I cut the grass at 1 1/2"x6 1/2".  Using my Wild Card Cricut cartridge and mini gel pens I had my Cricut write the letters Happy Thanksgiving in a dark green color. Then I used my Home Accents cartridge and cut the oval circle around Happy Thanksgiving. I used my Copic Y19 marker to color in the Happy Thanksgiving. I also cut the oval a second time to create the background accent in brown paper. I accented with a brown ribbon.  The turkey was cut at 3 1/2" from Stretch your Imagination on page 49.  Pop-ups are used behind the turkey and behind the Happy Thanksgiving.  I used Xmas Red Stickles for the eye.  Hope you enjoy this nice little Thanksgiving card.

Wednesday, November 17, 2010

Wedding Card - Wild Card Cricut Cartridge


Cardcrazy09 demonstrates how to make this card in a video on YouTube under Wild Card Wedding. This card is in the Cricut Wild Card cartridge instructions on page 63. The card and envelope are 5 1/4". A liner for the envelope was also made. The flowers are found in the liner option and are cut at 5 1/4" also. I used the Plum Blossoms folder in my Cuttlebug on the cake and added Stickles to the center of the flowers. A white bow is glued to the top of the cake.

The inside of the card lettering is made using the Cursive 101 Cricut cartridge. I cut the letters twice and offset them to give a shadow effect. 

The Bride and groom were cut using the icon feature on page 63 of the Wild Card.  I used Stickles for the brides dress.


Thanksgiving Card - Stretch Your Imagination and Wild Card Cricut Cartridges

This Thanksgiving card is 5"x7" folded, using the Cricut and Stretch Your Imagination and Wild Card cartridges  The turkeys are 3 1/2" and 2 1/2".  The paper is from the Paper Studio Affinity paper pack. The "Happy Thanksgiving" greeting is made using the mini gel pen in the Cricut.  I used Stickles for the sparkle and a brown ribbon to finish the card.  I hope you all have a very happy Thanksgiving.

Sunday, October 31, 2010

Cookie for Sis - Everyday Paper Dolls Cricut Cartridge


This card is 5"x7". The cook is made from the Everyday Paper Dolls Cricut cartridge.  The "cookie for sis" is made using the Cursive 101 Cricut cartridge. I added white ribbon on the two corners and crystal stickles to the flowers. I used the Cuttlebug on the light pink paper using the Plum Blossoms embossing folder. Just add a cookie and your good to go for a nice little gift for your sister.

Thanks A Million - Everyday Paper Dolls Cricut Cartridge


This "Thanks a Million" card is 5"x7".  The Dr. is made from the Everyday Paper Dolls Cricut cartridge.  The leaves are stick-on's from Creative Memories.  The Thanks a Million is on page 70 of the instruction manual in the Wild Card cartridge.

Saturday, October 2, 2010

Birthday Card - Stretch Your Imagination Cartridge


This Happy Birthday card was made using the Stretch Your Imagination cartridge.  This card is 10x7 folded to 5x7. I used the birthday cake (brown) and then cut the frosting in silhouette (deep pink) and cut the candle (deep pink). I embossed the purple sheet of paper using the cuttlebug and tied a shear brown ribbon around the center of the card.  Happy Birthday was cut out from the Wild Card cartridge.

Tuesday, September 28, 2010

Glass Etching - Plantin SchoolBook Cricut Cartridge


I made the template for the names, above, with my Cricut Expression using the Plantin SchoolBook cartridge for the glasses.  The bottom of the letters are 2.1" from the top of the glass.  The lettering is 1" high on both names and 2.39" and 2.015" wide respectively.  This mug is square and is very easy to place the template without bubbles forming.  I generously put Armour Etch cream on the mugs for 15 minutes and then washed the cream off under running warm water.

Saturday, September 25, 2010

Warmest Wishes Card Challenge - Wild Card Cricut Cartridge


This card was made for Karlee's challenge at http://www.karleekrafts.com/ for Robyn's, My Pink Stampers challenge on Friday, September 24, 2010.  Robyn is giving eight of her stamp sets to the winner.  Check out the challenge at Karlee's blog or at http://www.mypinkstamper.com/.

This card was made with the Cricut Expression using the Wild Card cartridge. The envelope is lined and accented with blue ribbon and the card is accented with a blue ribbon running through eyelets.  The inside of the card is a branch with warmest wishes lettering.  I love the pretty pink paper and the pink accented layering on the card


Friday, September 24, 2010

Thanks Card - Home Accent Cricut Cartridge


The "Bird - Thanks" card is made for a challenge for Robyn's, My Pink Stamper blog on 9/23/10. The challenge is to make a card with a bird.  Visit her blog at http://www.mypinkstamper.com/.  She is featuring lots of great giveaways and has great tutorials on the Cricut.

Wednesday, September 22, 2010

Glass Etching - Stretch Your Imagination, Joys of the Season and Wild Card Cricut Cartridges


These four glasses were etched using the following Cricut Cartridges (Left to Right):
Hearts - Wild Card
Wedding Glasses - Stretch Your Imagination
Flower - Joys of the Season
Pine Cone - Joys of the Season

Each template was cut at 3" using vinyl as a template.  Armour Etch Cream was put on with a small brush, generously.  After 10 minutes rinse the glasses with warm running water from the sink. Remove the vinyl and dry the glasses.  You have beautiful glasses in just minutes. .


Tuesday, September 21, 2010

Glass Etching - Blackletter Cricut Cartridge


I etched these glasses by using my Cricut Expression and scraps of vinyl to make the template.  I used the Blackletter Cricut Cartridge.  The lettering is 1 1/2" tall.  I used a small paint brush and generously applied the Armour Etch cream and let it set for 10 minutes.  Then I washed the glass under warm running water and pulled the vinyl template off.  It's easy to etch glasses.

Monday, September 20, 2010

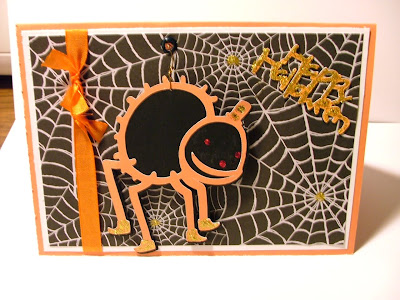
Spider - Halloween Card - Stretch Your Imagination


Robyn at MyPinkStamper posted a challenge 9/30/10 to "Just make a project that is Halloween or Fall themed and you will have the chance to win a Spooky Puns stamp set" from http://www.mypinkstamper.com/. Above is my challenge card.  Visit Robyn's site and enter the challenge for a chance to win her Spooky Puns Stamp Set.
 
This card was made with the Cricut Expression using the Stretch Your Imagination cartridge.  I used: the Silhouette (orange) and Blackout (black) and the spider (black) paper.  Glitter was used on the feet and webs.  An orange ribbon was used. Happy Halloween was cut from the Wild Card cartridge.  I used a brad and strung 24 gauge wire going through the top of the card and the top of the spider so the spider is free floating.  I used orange, white and a spider web print paper for the card.  I used red stickles for the eyes and nose.  This was a fun card to make.

Friday, September 17, 2010

Butterfly Card - Cricut Home Accents Cartridge


This card was made with my Cricut Expression using the Home Accents cartridge. The card was cut at 5 1/2" x 11".  I used a yellow ribbon and Crystal Stickles. The butterfly is cut using layer and shadow features.

Thursday, September 16, 2010

Owl Card - Animal Kingdom

This Owl is from the Cricut Animal Kingdom cartridge.  I used flocking on the Owl and Crystal Stickles for the eyes and on the feathers.

Wednesday, September 15, 2010

Chicken Card - Animal Kingdom Cartridge


My card was made using the Animal Kingdom Cricut Cartridge. I used flocking on the body of the chicken and Crystal Stickles on the wording.

Tuesday, September 14, 2010

Fisherman Card - Everyday Paper Dolls Cartridge

This card was made with my Cricut Expression machine using the Cricut Everyday Paper Dolls cartridge.  I used the Robert Stanley Collection ribbon.  This is one of my favorite cards.

Monday, September 13, 2010

Flower Bouquet

I saw this tutorial on Custom Crops.  I made this with my cricut expression and followed alot of the tutorial, but made my own changes as I went.  Cut the flower petals out of thick cardstock paper and bend the petals forward. I used my Accent Essentials Cricut Cartridge for the flower petals.  Attach the long part of a clothes hanger with glue to the back of the flower. I glued a white or red rose in the center of each flower. I used the Celebrations Cricut Cartridge to make the scalloped name tag.  I used the Tiffany's Designer Scrapbook Pad paper for the paper around the flowers. Just roll the paper and glue.  I put a brad on each side of the top of the paper and attached a string of pearls for a hanger.  I put a string of lace around the bouquet and a small bow at the top of the pearls.  Hope you enjoy the project as much as I did.  I made this for a friend who was not feeling well.  I sprayed a little perfume on the flowers for a scent.

Sunday, September 12, 2010

Raccoon Card - Animal Kingdom Cartridge


This is a quick and easy card made by using my Cricut Expression Machine.  I used the Animal Kingdom Cricut cartridge.  The STOP sign is a metal accent from Marcella by K.  I used Crystal Stickles for the eyes. I love the raccoon - he's a Wild Thing.

Vinyl Door Application - Welcome Lettering


This WELCOME lettering is made with Provo Craft black vinyl.  I Used the Cursive 101 Cricut cartridge for this project. The dimensions are 3.433 x 16.825.  I made this WELCOME lettering to be attached to the outside of a front door. It is a 3 mil vinyl and adhesived-back. The transfer tape is on the front/back for easy mounting on your door and to protect the project until it is hung on a door.  I just love this font style. 

Saturday, September 11, 2010

Card for MyPinkStamper entry regarding 9-11 memory


I made this card with my Cricut Expression machine.
 
I used my Everyday Paper Dolls cartridge for the military man, Cursive 101 cartridge for the USA and Wild Card cartridge for the Thank You.  I used Crystal Stickles on the USA and Paper Studio self-adhesive ribbon. I used pop ups on the man and Thank you. Finally, I used the Oriental Weave and my Cuttlebug on the paper.

This project was made for the My Pink Stamper, September 11, 2010, challenge.